Project Two - the Muchelney Roundel
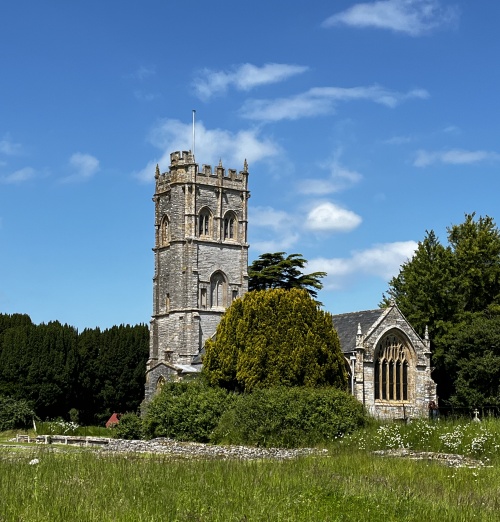
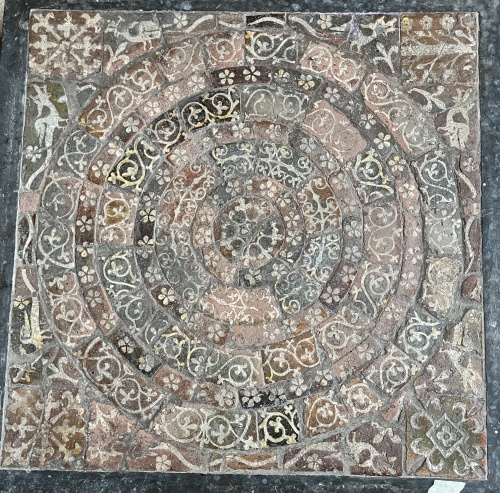
This project is trying to replicate the roundel found in Muchelney Church in Somerset. The original roundel was removed by the Victorians during excavations of the ruins of the adjacent Muchelney Abbey in 1873. There are two roundels in the church - probably formed from a larger number of roundels from the Abbey ruins. There is a roundel by the altar which is surrounded by other tiles (presumably from the abbey). There is another by the font which is more complete and it is this one I have concentrated on. It would seem that some tiles broke or were lost during re-location as the roundel by the font in the church is a bit of a mongrel with some tiles from one roundel and some from another (see Somerset Tiles book by B J Lowe, 2003).
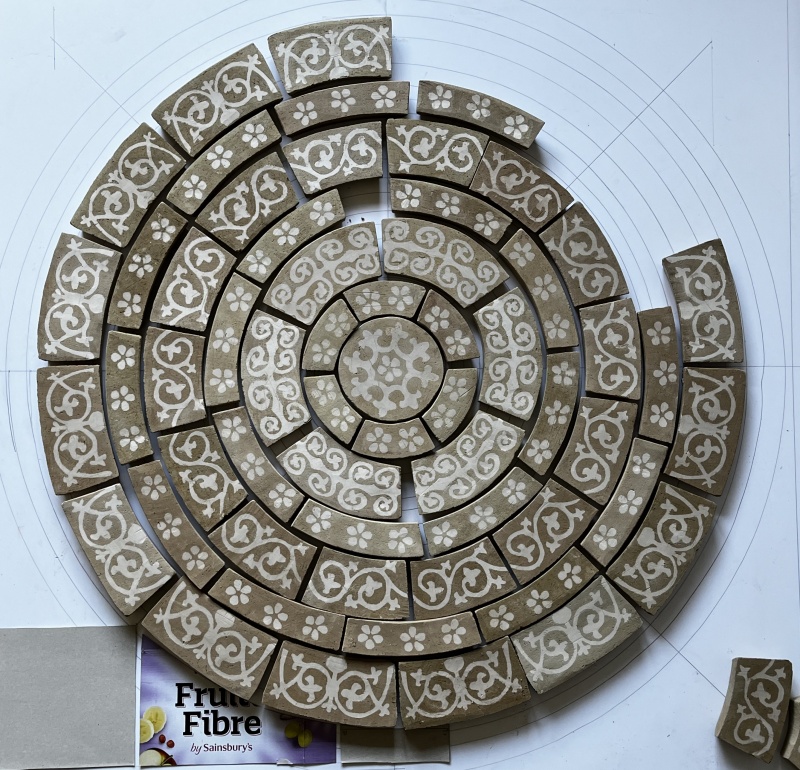
I have worked to recreate a single roundel (the one that is dominant in the ‘font’ roundel) so, once completed, this will be first time the roundel will have been seen in its original design for over 800 years.
Whilst I was making my initial tiles I started to appreciate the difference between the line/block drawings in the official Somerset ‘catalog’ and the actual tiles. Most tiles are heavily worn and the designs badly damaged so there is plenty of scope for artistic interpretation. This often ignores some of the technical issues in a tile design. For example many designs are created to be set in fours to give a larger circular design pattern and it is important the pattern joints up at the edges. This can be seen in the central motif in my ‘sampler’. That design was taken straight from the Norton Winchester College catalog and several of the components that build up features that run around the circumference do not line up.
To avoid such artistic license I visited Muchelney Church armed with pencils, tracing paper, sticky tape etc. and traced the tile designs. Knowing that there was probably only one stamp made for each tile design allowed me to assume that similar tiles were actually identical and so I could build up an accurate tracing by mixing and matching between tiles within a ring. Not perfect but it did limit the artistic license!
The roundels at Muchelney are complete (all the rings are present) and have corner pieces that allow them to fit into a square pattern and, presumably, match up with the rest of the tiled floor. This means that the overall size of the roundel needs to be a multiple of the individual tile size. I set out to make a finished roundel that was 3 foot or 36 inches square. However this is the finished, fired size and there is some gap between each tile for natural variation and to allow grouting. Trials with our home dug clay suggested that it shrank about 12.5% between the mould and the finished, fired tile and that much of the shrinkage occurred before firing. I then planned for a 1/8 inch (3mm) gap between the tiles when they were lain.
How to lay out the design and determine the precise tile shape? This was a big challenge at this scale! I resorted to a lot of trigonometry and spreadsheet calculations. How was this done in Medieval times? Some of the best roundels we have (Clarendon (1244) and Muchelney) are earlier than many other pavements so this was sorted out early! These pavements were being created for grand new buildings that were being built from the ground up. I am reminded that there is evidence at some cathedrals of large ‘drafting rooms’ akin to sail lofts, where masons could draw out window patterns etc. in full scale on the floor. York Minster has a Mason’s Loft over the entrance to the Chapter House ( https://www-users.york.ac.uk/~arch40/masonsloftintro.htm ). The loft was created in the early 14th century. It has excellent lighting, a fireplace for warmth and a plaster of Paris ‘tracing floor’ where the shapes of large windows, vaults etc. could be lain out. Did the tile makers who were building these roundels utilise this skill set? Tiles were probably lain late in the building process once all the internal scaffolding was removed. Did the tile makers use the stone masons design facilities that were no longer in high demand?
Although I have used trigonometry to help me I have found scaling dimensions up to the full size without introducing errors very difficult. Half a degree out on a 3ft diameter roundel can introduce sizable errors. [I am just starting {Sept25} to think about recreating the Clarendon roundel so I can try harder second time round - see a later post]
I made one stamp for each ‘ring’ and tried to ensure the angle/length was as accurate as possible. I then defined the overall shape I wanted (a segment of a ring) and cut a template in thick plastic (opened up plastic milk bottles - maybe akin to thick parchment or vellum?). For each pattern I made a rectangular mould that encompassed all of the design with space to spare. Once the tile had been stamped out, the indents filled with white slip, the tile released from the mould and then left to harden a little I placed the template over the oblong tile and positioned the design centrally under the template. I could then mark out and cut out the tile - slowly refining the shape and the chamfer as the tile dried.
Despite numerous calculations my rings were not that precise and in a couple of instances I have had to make ‘fillers’ to pad out the ring to the right dimensions. I suspect this is because the clay shrinks through out the drying process and I was cutting out the shapes at a leather-hard stage but using the dimensions from the fired state. Must try harder and do better next time!
I made all of the tiles and aligned them before I fired any - I am not sure if that helped.
This was the first pavement that I had made from our garden dug clay and in trials my initial glaze crawled. With repeated trials and failures I worked out that the glaze could not be too thick. I standardized the consistency of the glaze using a simple hydrometer made out of light pipe weighed with lead (this could also be done by weighing a defined volume). I then limited the dipping to about three seconds (saying ‘elephant’ three times seemed appropriate for Muchelney).
Once I had made and fired all of the tiles I made a ‘frame’ for the pavement from straight wood and making sure all corners were precise right angles. This allowed me to experiment with spacings and tile numbers. The bulk of the design fitted the frame well but two of the sides turned out to be a little ‘tight’ and there would be no space for any mortar. To ease the tight spacing I remade two of the ‘dragons tail’ pieces. As this was the simplest design in the roundel making new stamps was quite quick. Was this a trick the medieval potters used - did they build some blank or simple designs into pavement designs to help with layout and fixing?
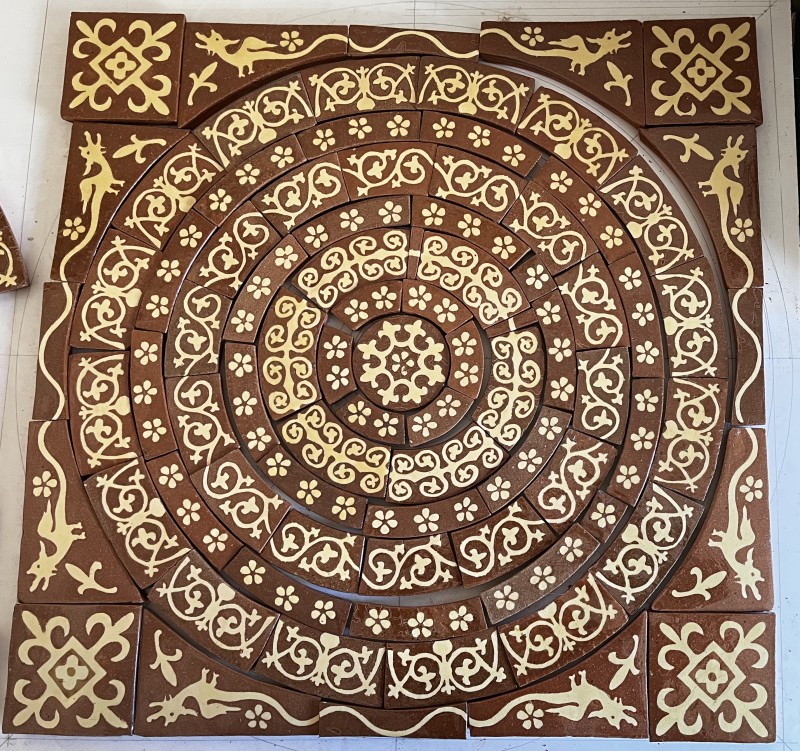
The above picture is the first time the roundel has been seen in an original single-design (rather than the mongrel mash up) since, probably, the Monastery was dissolved and demolished under the orders of Henry VIII (1536 - 1541) . The colours and contrast and boldness of design are all much stronger that the version in the church. I think this is historically correct - but more about that in another post!
The roundel is now (Sept25) finished and complete. The between-tile spacings look about right. It will spend the winter nestling in its frame in our gazebo but I am not sure we have the space to install it permanently. It would be great to see it installed in a better, more appropriate setting and somewhere where it can be enjoyed by more people - suggestions welcome!